Everything you can do with the app. The same guide is inside the app: click User Guide on the start screen.
Welcome to DiscoCast
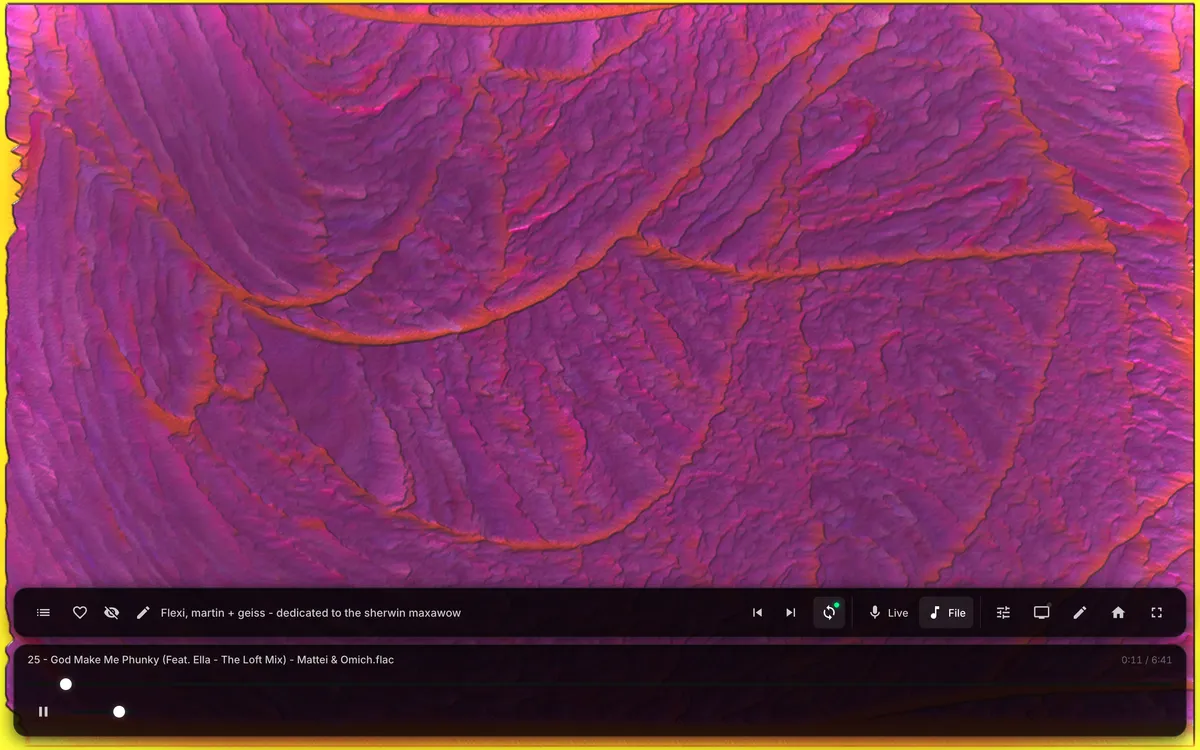
The player: visuals fill the window; the control bar appears when you move the mouse.
A live visuals platform for DJs, VJs, and performers. Powered by the Winamp MilkDrop engine, it gives you 1,144 reactive presets out of the box — plus a full studio to build your own by mixing images, video, GIFs, and text, a timeline sequencer to script complete shows, and live performance tools built for the stage.
1,144 bundled presets — from subtle ambient washes to peak-hour chaos.
Live performance suite — Auto-Gain, Kick-Lock, Energy slider, and instant "Hype Keys"
for DJs and VJs.
Build your own visuals — the Preset Studio lets you design reactive presets from
scratch, no code. Add image, GIF, video, or text layers on top of any preset.
Sequence a live show — the Timeline Editor lets you arrange presets across time and
across multiple screen zones, then play them back as a scripted performance.
Pick a section on the left to dive deeper, or press a button on the start screen to
jump in.
Audio Sources
The control bar: presets, favourite / hide, previous / next, auto-cycle, Live (mic) and File sources, then tuning, output, Studio, home and fullscreen.
Three ways to feed the visualizer:
Live Audio
Uses your microphone, line-in, or any connected USB device (DJ controllers, audio interfaces). When you
pick Live Audio, a device selector appears so you can choose the exact input.
Requires microphone permission — grant it in your system sound/privacy
settings if prompted.
Audio File
Load a local MP3, WAV, or FLAC. You get a transport bar with play/pause, seek, and
volume. File audio is split two ways: one path to your speakers, one to the visualizer (with a 5×
sensitivity boost to make visuals pop).
Preset Studio
Skip the visualizer entirely and go straight into the creative editor to design your own presets from
scratch. See the Preset Studio section for details.
Playing in a Club or Loud Venue
Laptop mics in loud rooms are tough — here's what actually works, in order of how well it works:
Booth Out / Record Out → USB audio interface — plug directly into the DJ mixer's
record output. Zero room noise, perfect signal. Even a $35 iRig works.
Loopback / BlackHole — if the DJ is playing from the same Mac, route internal audio
directly to DiscoCast. 100% clean, ignores the room entirely.
USB audio interface with XLR mic — better preamp, physically further from the
speaker stack than a laptop mic.
Built-in laptop mic — last resort. Enable Noise Gate + Kick
Lock in the Tuning panel. Position the laptop away from the speaker stack — even 6 feet makes a
big difference. Angle the screen away from the speakers. Setting it on something soft (a bag, a
hoodie) reduces sub vibration coupling through the table. If the VU meter shows CLIPPING,
no software setting can fix it — the mic is physically overwhelmed and needs to move further away.
💡 Covering the mic to muffle sound reduces everything equally — noise and signal
drop together, so AGC just cranks back up. It only helps if the meter is showing CLIPPING, where it
brings the signal back under the clip ceiling.
Browsing the Preset Library
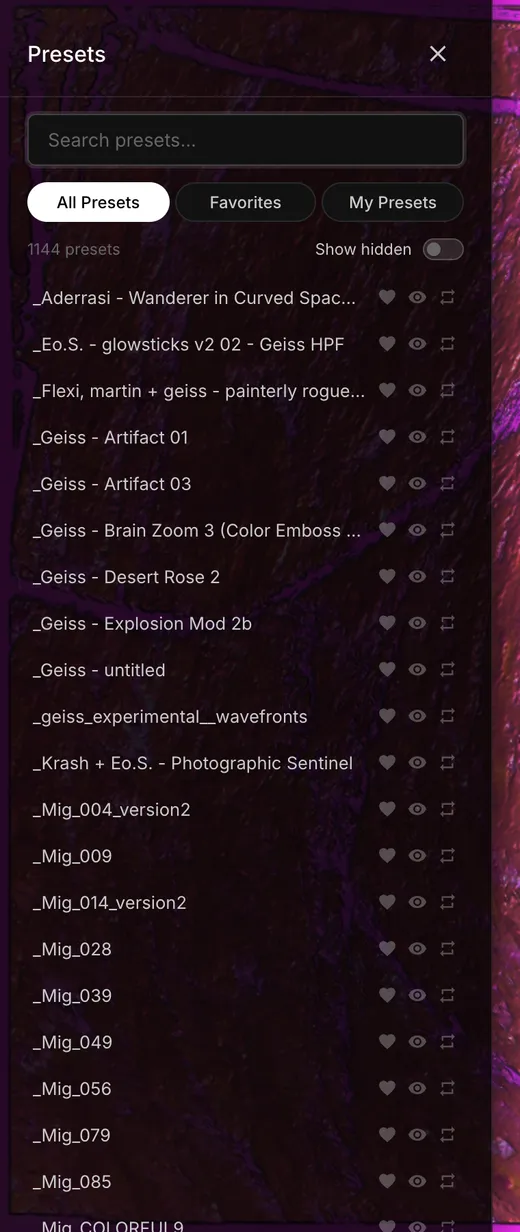
Press P for the preset drawer: search, tabs, and per-preset favourite / hide / cycle buttons.
Open the drawer with the list icon in the bottom bar or press P. Everything about the library
lives here.
Search & Tabs
Type in the search box to filter by name. Three tabs across the top:
All Presets — the full 1,144-preset library.
Favorites — just the ones you've hearted.
My Presets — anything you built in the Preset Studio.
Favorites & Hiding
Hover a row in the drawer to reveal two icons: a ♥ heart (favorite) and a ⊘ eye-slash (hide). On the currently-playing
preset, press S to favorite or X to hide.
Hidden presets disappear from the All tab, random picks, and auto-cycle. Toggle Show hidden at
the top of the drawer to bring them back — individually, or via Unhide all.
Community Packs (desktop app)
Want more visuals? Click Import (in the player or Preset Studio) to open the
Community Packs tab and one-click install extra preset packs — the app
ships with Extras Vol. 1–3 (750 more full-fidelity MilkDrop presets). Watch the install
progress, then find them by typing the pack name (e.g. Extras 1) in any preset search
box — each installed preset is tagged with its pack. Remove a pack anytime from the same screen.
The other tab, From File, imports your own .dcshow.json preset exports.
(Community Packs install in the Mac/Windows desktop app.)
Navigating
← / → step through the full library. Arrow keys always navigate the complete
library, even when favorites-only cycling is on — so you can always explore.
Auto-Cycling
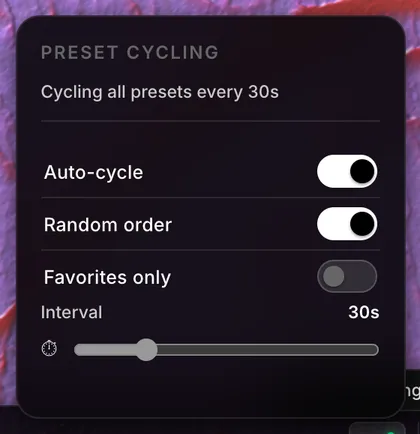
The cycle panel (R): auto-cycle, random order, favourites only, and the interval.
Let the app rotate through presets automatically. Click the cycle icon in the control bar (or press
C) to open the Cycling popover.
Auto-cycle — on/off. Default interval is 30s.
Random order — shuffle vs. sequential.
Favorites only — restrict the cycle pool to your hearted presets. Perfect for live
sets — curate once, cycle through the night.
Blend time — how long transitions take.
If Favorites only is on but you haven't saved any, the cycle silently falls
back to the full library so you're never stuck on a blank screen.
Live Performance Tools
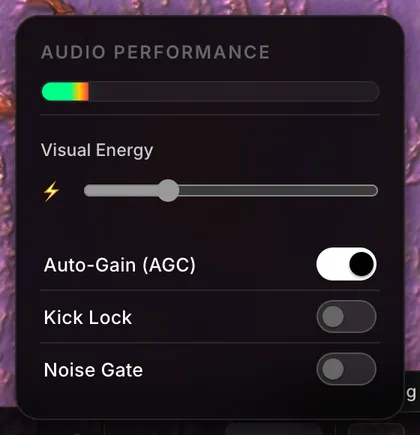
The Audio Performance panel (T): live level meter, Visual Energy, Auto-Gain, Kick Lock and Noise Gate.
Designed for DJs and VJs — quick access to everything you need mid-set.
Audio Tuning (press T)
Energy slider — master visual sensitivity, 0.2× to 5×.
Auto-Gain (AGC) — dynamic normalization so visuals stay "hype" regardless of input
volume. A toggles it. On by default.
Kick-Lock — low-pass filter at 150 Hz locks visuals to the kick drum only.
K toggles it.
Noise Gate — cuts signal processing when the room is quieter than a set threshold.
Prevents visuals jittering on constant ambient noise (air conditioning, crowd hum, a loud room).
Off by default. When enabled, a threshold slider appears — start low and raise it until the jitter
stops. The VU meter shows GATED when it's actively blocking noise, and
CLIPPING (red flash) when the mic signal is too loud for software to fix.
Hold Shift — momentary 2× boost for drops. Silent — doesn't reveal the UI.
Hype Keys
Instant visual accents, beat-synced by hand:
V — Strobe (white flash)
B — Blackout (cut to black)
I — Invert colors
H — Hide UI instantly (for clean projector feeds)
Auto-hiding control bar
The bottom bar fades after 3 seconds of inactivity but stays visible while you hover or while a popover
is open. Move the mouse to bring it back.
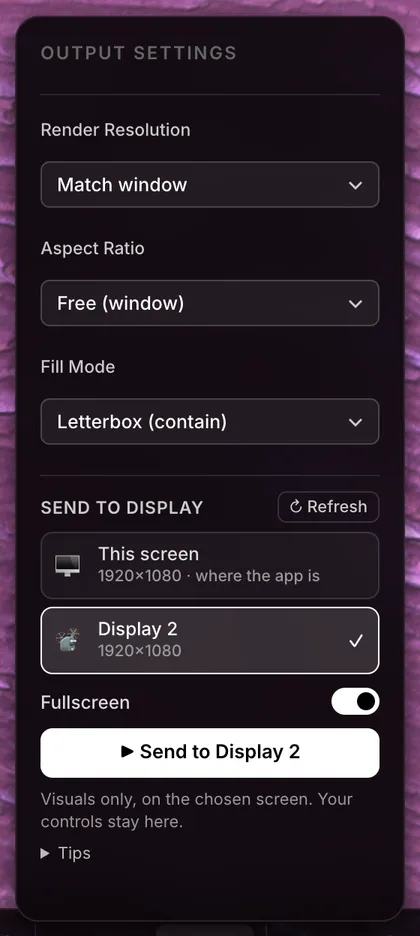
Output Settings
Control exactly how and where the visualizer renders. Open the Output panel with the monitor icon in the
control bar, or press O. Settings are saved and restored automatically on every load.
Default settings (out of the box)
Resolution — Match window. Canvas always fills whatever size the app window is.
Aspect Ratio — Free. No constraint; proportions follow the window.
Fill Mode — Letterbox. If a resolution is locked, black bars appear rather than stretching or cropping.
Virtual Camera — Off. No stream is started until you turn it on.
Nothing to configure for normal use — defaults give you a clean full-window visualizer. Only open Output Settings when you need a specific projector resolution or want to feed the canvas into OBS.
Send to a projector or second screen
The Output panel (O): pick a screen, then ▶ Send to Display 2.
Shows the visuals alone (no controls) on another screen, while every control stays on
this one. Your screens appear as buttons; the one you pick is remembered.
Connect the projector with a cable and set it to Extend (not Mirror) in
System Settings → Displays. Wireless AirPlay lags too much for live visuals.
Click the projector's button, keep Fullscreen on, then ▶ Send to ….
The button becomes ■ Stop output with a green dot while it runs.
In the output window: F toggles fullscreen, D shows stats (fps / delay).
Not listed? Plug it in, set it to Extend, then ↻ Refresh.
Render Resolution
Pin the canvas to a fixed pixel size regardless of the app window. Choose from the dropdown or enter
a custom width × height and click Apply.
Match window (default) — canvas always fills the window at its natural size.
1280×720 — HD. Good for older projectors or lower-spec machines.
1920×1080 — Full HD. Most common projector native resolution.
2560×1440 — QHD. High-end displays and LED walls.
3840×2160 — 4K. GPU-intensive; test performance before a live show.
Custom… — type any width and height and press Apply. Useful for
non-standard LED panel dimensions or portrait columns.
When a resolution is locked, the canvas renders at that size regardless of how
large or small the window is. The Fill Mode setting below controls how it fits inside the window.
Aspect Ratio
Constrain the canvas proportions without fixing the pixel count. Useful when the window size changes but
you always want a specific shape.
Free — no constraint; canvas matches the window exactly.
16:9 — standard widescreen. Most projectors and TVs.
21:9 — ultra-wide / cinema. LED banners and wide screens.
1:1 — perfect square. Club screens, Instagram-format content.
9:16 — portrait. Vertical LED columns, phone-format screens.
Fill Mode
How the locked canvas is positioned inside the window when its ratio doesn’t match:
Letterbox (default) — canvas is centered with black bars filling the gaps.
Nothing is cropped or distorted. Best for projectors where accurate proportions matter.
Stretch — canvas fills the window completely, ignoring proportions. Use when
the output device matches the render resolution exactly.
Crop — canvas fills the window and any overflow is hidden. No black bars, no
distortion, but the edges are cut.
Virtual Camera
Experimental, browser only. The Virtual Camera switch starts a canvas
stream inside the page, but it does not show up as a camera in Zoom, Teams, or OBS yet,
and it isn't available in the desktop app.
To get the visuals into OBS today — add a macOS Screen Capture (or
Window Capture) source in OBS, pick the DiscoCast window, and press H to hide the
controls. OBS's own Virtual Camera can then feed Zoom / Teams.
Projector workflow tip
For a live show: set Resolution to 1920×1080, Aspect to 16:9 and
Fill Mode to Letterbox, then use Send to a projector (above) so the
projector shows clean visuals while you keep your controls. No second screen? Press H to hide
the UI and F for fullscreen.
🎨 Preset Studio
From the main screen, click Preset Studio under Creative Tools. You'll land on the Studio's own source screen — choose Live Audio (mic or audio interface), Load Track (MP3, WAV, or FLAC), or No Audio to jump straight in. Loading audio is recommended: it activates all the audio-reactive features. Once you're in, a live canvas runs on the left with a tabbed control panel on the right. Every change updates instantly.
Overview Creative
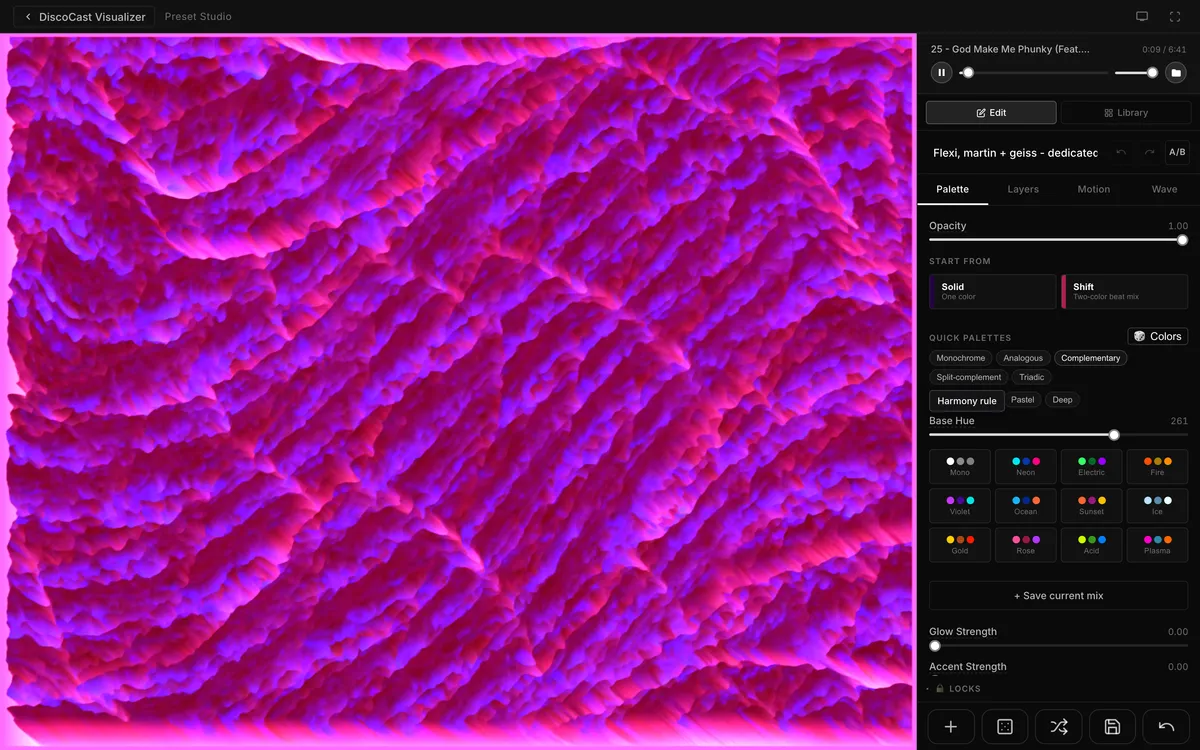
The Preset Studio: the live canvas on the left, every control on the right (here: editing a bundled preset).
The Preset Studio is a complete visual preset builder with 4 tabbed sections, undo/redo, A/B comparison, and a library of 1,144 bundled presets to use as starting points.
Palette — Color grading, palettes, the 🎨 Color Studio (harmony roll, tone, Base Hue, Color Roll), the 🌈 Color Field (moving multi-colour background), glow bloom, and scene effects
Motion — Motion engine (living motion), the Flow warp-field library, Quick Looks, and audio reactivity
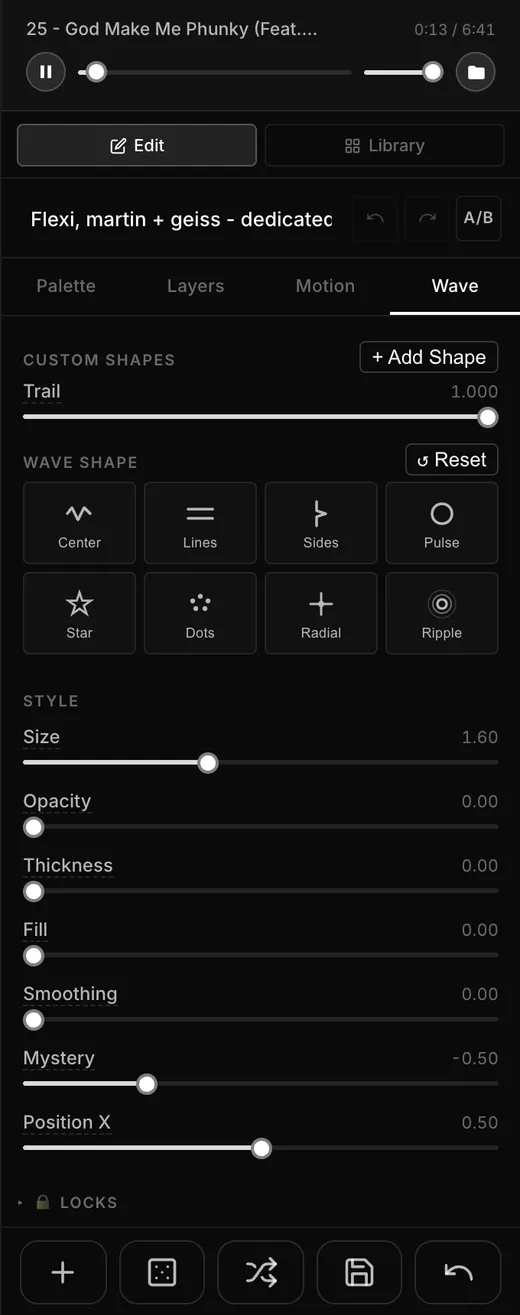
Wave — Custom Shapes + the global audio waveform overlay
Layers — Add images, GIFs, video, and text on top
Color & Palette
PaletteMotionWave
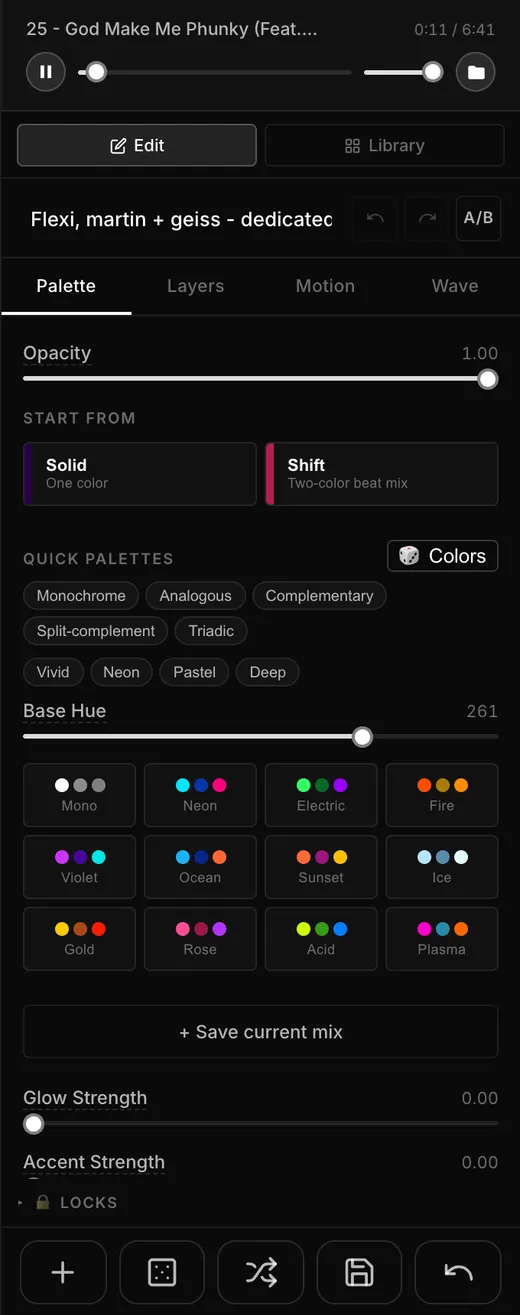
Palette — 12 one-click palettes with hover-to-preview (mouse over a chip to see the colors live on the canvas without committing), plus three independent color swatches (Wave / Glow / Accent) with per-channel 🔓/🔒 locks so a palette only writes the unlocked channels. "+ Save current mix" pins your active Wave/Glow/Accent triplet as a 13th "My Mix" chip. Glow Strength and Accent Strength ✨ now add a colored bloom — a soft halo around the visuals tinted by your Glow / Accent colour, so all three palette colours show on the visualisation itself (not the old edge-border ring; the Outer/Inner Border sliders still give you true borders if you want them). Plus Saturation, Hue Rotate, and scene-level toggles (Brighten, Solarize, Invert, etc.). The Opacity slider at the top fades the MilkDrop background itself — drag it to zero and only your layers show over a black canvas.
🎨 Color Studio ✨ (beside Quick Palettes) — 🎲 Colors rolls a full harmony-aware random scheme; under it you can steer the roll: harmony-rule chips (Monochrome / Analogous / Complementary / Split-complement / Triadic), tone chips (Vivid / Neon / Pastel / Deep), and a Base Hue slider. Pick any to steer, leave them clear for pure random, or click an active chip again to clear it — and 🎲 lights up whatever it landed on. A Color Roll slider gently cycles the whole scheme's hue over time. Everything honours your per-channel 🔒 locks, so lock a colour you love and reroll the rest.
🌈 Color Field ✨ (in the Shift panel) — turns the background into a living, moving multi-colour field instead of a flat slab. It takes Shift's signature A→B colour blend (your dance/VJ pulse) and spreads it across the screen: pick from 22 styles — Flat (the classic flat Shift) plus 21 moving fields (Linear, Stripes, Weave, Radial, Diamond, Moiré, Conic, Spiral, Rays, Vortex, Mandala, Plasma, Clouds, Marble, Ripples, Checker, Hex, Chevron, Dots, Grid, Caustics) — and shape each with Scale (pattern size), Motion (drift speed), Spin, Sharpness (hard bands), Warp (an organic ripple that wobbles any pattern), an optional 3-colour blend, and a beat-reactive amount that makes the field breathe to the music. It still pulses to the audio. A separate Background swatch gives the field its own colour, distinct from the wave/shapes/flow on top — so the 🎲 roll lands three contrasting-but-harmonious colours (background field vs. foreground content) and nothing melts into one colour.
🎚 Color adjustments ✨ — Brightness, Contrast, Gamma, and Temperature faders (beside Saturation / Hue Rotate / Color Roll) that adjust the final output of any loaded preset — including the 1,144 bundled MilkDrop presets. Load a preset, then warm or cool it, punch the contrast, or lift the mids to re-mood it live and make it yours. Underneath, a Color Reactivity ✨ panel makes those adjustments pulse to the beat: pick a Source (Bass / Mid / Treble / Volume / Flux) + Curve, then dial how hard Brightness / Contrast / Gamma / Temperature breathe with the music — on any of the 1,144 presets. Below that, a 🎛 Scene FX ✨ rack — Bloom (a soft glow from the blurred image that softens/fills any preset incl. the 1,144 bundled), Posterize, Vignette, Scan lines, and Film grain — finishes the final image of any loaded preset (Posterize & Vignette read strongest on bright, full-screen presets; Bloom / Scan lines / Grain show on anything). Finally, a 🌙 Club / Dark Room ✨New knob — the go-to one-knob dark-room tune for any preset. It detects blown-out white (the kind that lights up a room) and crushes that specifically while pushing the remaining colour deeper, not dimmer — so whites collapse toward dark but the reds, blues, and greens get richer. A one-tap Club it button snaps it on; works on all 1,144 bundled presets too.
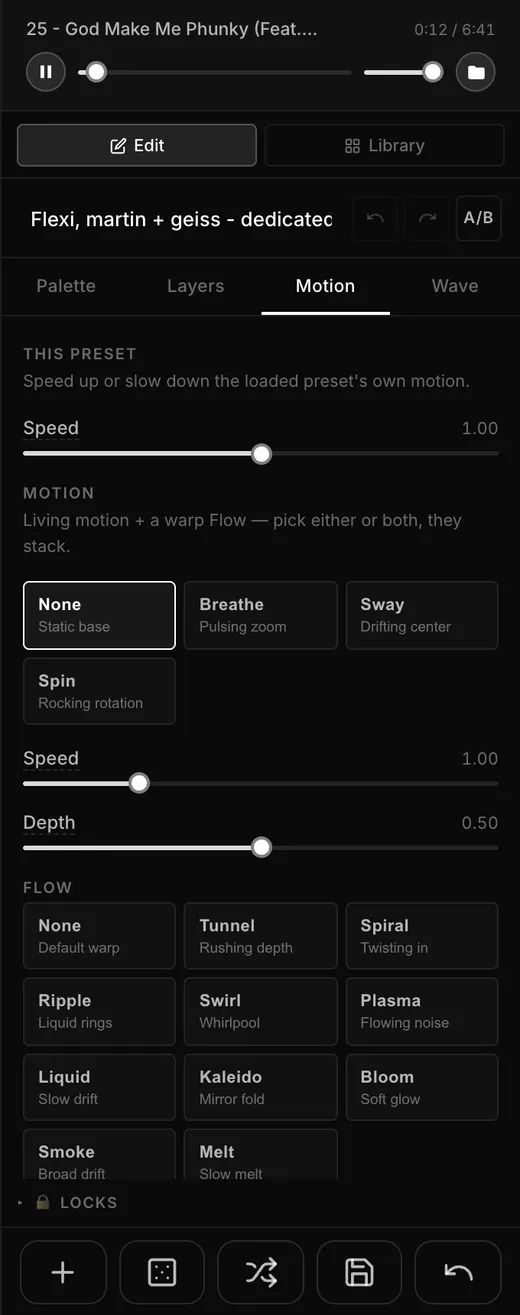
Motion — a Motion Engine ✨ at the top: pick Breathe (pulsing zoom), Sway (drifting centre), or Spin (rocking rotation) and dial two knobs — Speed and Depth — to give a from-scratch preset living, evolving motion instead of a frozen snapshot (it plays in the player & timeline too). Below it, a Flow ✨ warp-field library — sharp fields (Tunnel / Spiral / Ripple / Swirl / Plasma / Liquid / Kaleido) plus soft blur-sampled fields (Bloom / Smoke / Melt) that fill as broad glow instead of thin threads — each with Speed / Depth / Density knobs; this is the per-pixel motion field that gives most bundled presets their signature flowing look, now no-code, and it stacks on top of a Motion engine. Then Quick Looks (one-tap motion combos) with a ↺ Reset, and below them every control (zoom, rotation, warp strength, echo/decay, drift, warp center, beat sensitivity, and a full Reactivity panel — Source + Curve + amount sliders) laid out in the open, so the audio-reactivity controls stay visible rather than hidden behind a drawer.
Custom Shapes ✨ (Wave tab) — place up to 4 geometric shapes from scratch. Each shape is a card: drag the XY-pad to position it, then set Size, Sides (triangle → circle), Angle, Opacity, Fill colour, Border (on/off + colour), and Glow. A per-shape Motion block adds Spin & Orbit, and a full Reactivity panel (Source + Curve + Size / Opacity / Spin / Shake / Sides, each with its own source pill) wires the shape to the beat. A Trail slider sets how long shapes smear — all the way left is crisp (no trail), up gives long echoes. Shapes sit over the feedback presets and over a flat Solid/Shift background.
Wave — the global audio waveform overlay. 8 Shape modes (Center, Lines, Sides, Pulse, Star, Dots, Radial, Ripple) with a ↺ Reset button that hides the wave entirely — when the wave is hidden, no shape button looks "selected" until you actively pick one. Style sliders include a new Thickness slider (0–8) that smoothly scales the wave line from hairline to bold (replaces the old binary toggle), a new Fill slider (0–1) that fills the wave into a broad shape — a pulsing disc on the round modes, a solid wedge on the line modes — so it reads as a solid form rather than a thin thread (the value also sets the fill's opacity), and a Rotation slider (±180°) that spins the wave shape around its own anchor — all apply to every shape mode including Ripple. Plus a Reactivity panel: Source + Curve + four sliders (Size / Opacity / Shape / Orbit), with a small src pill next to each slider that lets you override the audio source per-slider (click cycles · → B → M → T → V → F). Unlocks combos like "bass pumps wave size while treble morphs shape."
Layers — add up to 5 layers (images, GIFs, video, text) on top of any preset. Always works on every preset, no exceptions. Full motion, transforms, 12-control color grading, VJ effects, and per-layer audio reactivity. Over a bundled MilkDrop preset a layer now sits still by default (it won't pick up the preset's motion — turn on the layer's own audio sliders when you want it to react), and your layers persist when you press 🎲 Random, so you can drop in a logo or clip and browse presets underneath it. The most powerful tab in the Studio.
The icon footer (5 big buttons with instant tooltips):+ New (blank baseline), 🎲 Random (one-click loads a random preset from the 1,144 bundled library as your editing base — turns the Studio into 1,144 starting points instead of one; click again to reroll. Lock it ✨ — open the 🔒 Locks panel just above the footer and hit Lock preset, and Random stops loading new presets: instead it re-moods the preset you're on — fresh colour grade, grade reactivity, Scene FX, and Club finish each press, all pulsing to the music, while the preset's motion stays exactly the same. Endless variations of a preset you love; unlock to browse fresh presets again), 🎲 Remix ✨ (rolls a complete new preset in one press — a moving colour field + three contrasting colours + a motion + a flow + a wave, all pulsing to the audio; in the same 🔒 Locks panel, the Remix · pin what to keep chips let you pin the parts you love — Colours / Field / Motion / Flow / Reactivity — and re-roll only the rest), 💾 Save, ↺ Reset. Two universal shortcuts: double-click any slider label to reset it to its default value, and pair 🎲 Random (load a bundled preset) with the Color adjustments + Color Reactivity to re-mood any of the 1,144 presets.
Workflow
Undo / Redo — 50-deep stack. ⌘Z / ⌘⇧Z.
A/B compare — hold the button to preview the saved state; release to restore.
Save — saved locally on your computer. Saved presets
appear in the My Presets tab of the main app.
Reset a slider — double-click its label to snap it back to the default
value instantly. Works on every slider in every layer card.
Preview mode — click the expand icon in the top-right corner of the topbar
(or press \) to hide the panel and see the full canvas. Click anywhere on the canvas
to restore the panel.
First-use tips — a tips modal appears when you open the editor. Dismiss it
freely or click "Never show again" to stop it appearing. Reset with
localStorage.removeItem('discocast_onboarding_never') in the developer console.
Dev HUD — press ` (backtick) to overlay frame time, estimated VRAM,
active layer count, and last shader rebuild time.
🖼️ Layers
Add up to 5 image, GIF, video, or text layers on top of any preset — always, no exceptions. Each layer has a full motion, transform, 12-control colour-grading, and VJ-effects pipeline, all wired to the music independently. And with Meld ✨, a layer can be fed into the preset itself.
Image & Video Layers Pro
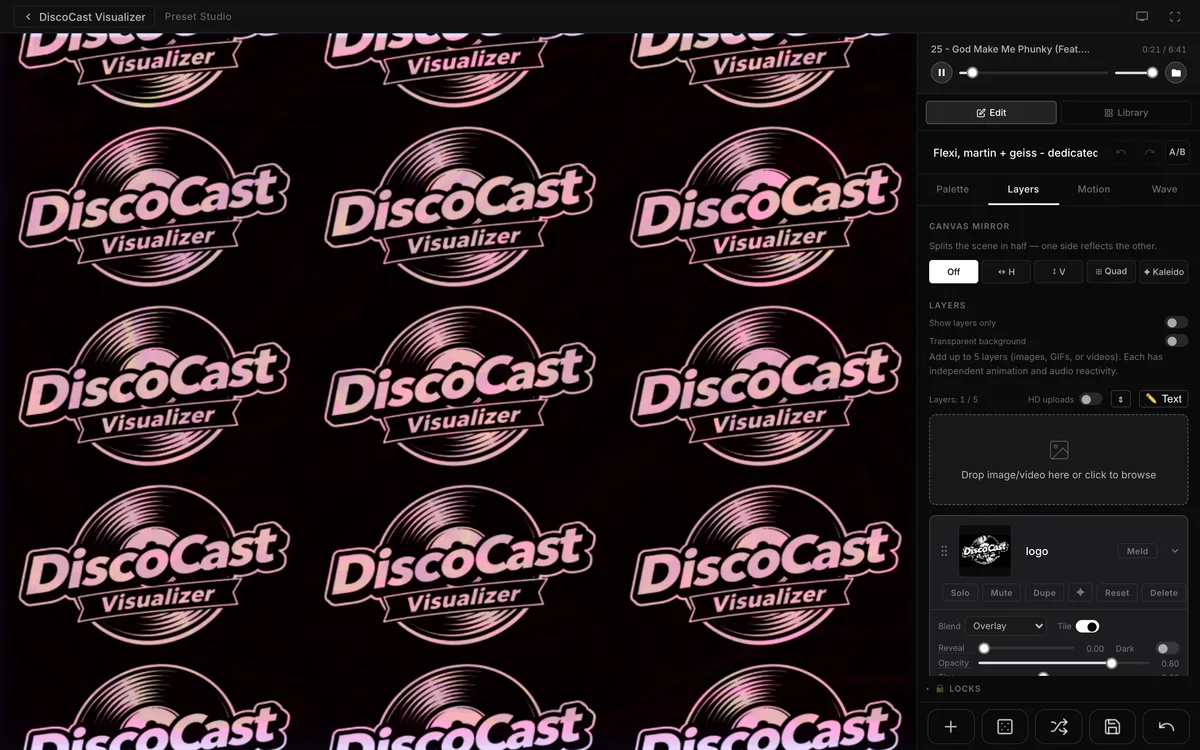
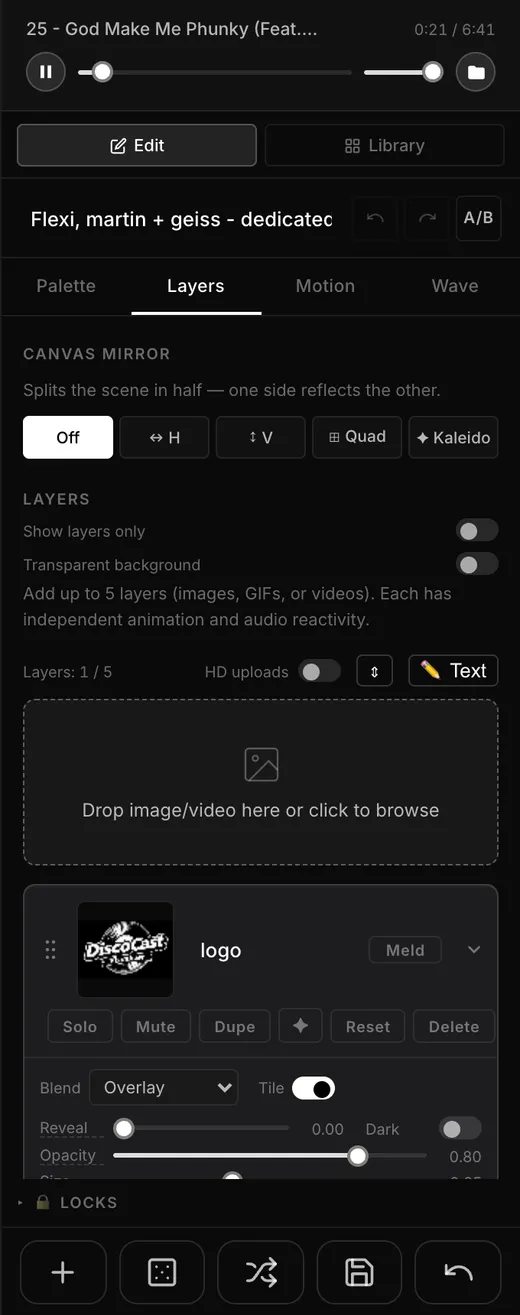
An image layer (here a tiled logo) composited over the preset.The Layers tab: drop zone, mirror, and a layer card with Solo / Mute / Dupe / ✦ Animate / Reset / Delete.
Add up to 5 image, GIF, or video layers in a collapsible smart-accordion stack. Drag any card to reorder. Each
layer has:
Solo / Mute — audition one layer in isolation or hide it without deleting.
Aspect (Lock / Fluid) — keeps a layer's true shape no matter the canvas. Lock (default) means resizing the window or going full screen reveals more of the scene instead of stretching the layer; Fluid lets it adapt to the canvas (the older behaviour). Works on single, tiled, and grid layers (grid uses Fill / Fit for its in-cell shape).
Per-Cell (tiled layers) — Offset staggers alternating rows or columns (classic brick / half-drop), Cell Rotate gives each tile its own random rotation with an optional 90° snap (Truchet mosaic), and Popcorn drives a per-cell audio pulse so individual tiles dance on different beat phases. The Variance sliders add procedural per-cell variety — Size Var (each tile a different size), Jitter X/Y (each tile drifts freely past its cell and overlaps its neighbours), and Opacity Var (each tile a different opacity); the Seed control reshuffles the random pattern, and Lock freezes one you like. All work alongside the existing Spin / Group / Angle.
Grid mode (tiled layers) — switch a tiled layer from Density (the Size slider drives the tile count) to an explicit Grid of Cols × Rows cells that fill the canvas. Fill stretches each image to its cell; Fit preserves the image's aspect with transparent padding. The Scale slider zooms the whole grid — below 1 it sits smaller with a margin, above 1 it zooms in past the canvas edge. Every per-cell effect and audio reaction works in Grid mode.
Recursive grids (Grid mode) — Subdivide splits each grid cell into an S×S inner sub-grid, and Outer Gap opens space between the outer cells so the sub-grids read as separate clusters with wide channels between them. Pairs with Spacing (the gap within a cluster) for two independent gap scales. Every per-cell effect varies across every inner cell automatically.
Beat Shake — omnidirectional random UV jolt on every beat. Pairs with Bounce for chaotic, energetic motion.
Beat Fade / Pulse / Strobe — audio drives opacity (smooth fade or hard strobe cut)
and size on every beat.
Tilt / Hop / Hue Pulse / Blur Pulse / Squash ✨ — five more beat-driven effects in
the Audio Reactivity panel: snap-rotate (Tilt), a directional left/right kick (Hop), a hue jump (Hue
Pulse), a focus pull (Blur Pulse), and cartoon squash-and-stretch (Squash). All ride the same Source +
Curve as the rest.
Mirror — Off, Horizontal, Vertical, Quad, or Kaleido (6-slice polar fold). Apply
per tile or across the whole field.
Canvas Mirror — folds the entire rendered scene horizontally, vertically, or both.
Tint & Color Grading — a full 12-control grading toolkit in the Tint section of every layer card (works on images, GIFs, video, and text): Brightness, Contrast, Gamma, Fade (lift black point for a film look), Color Temperature (warm/cool shift), Sepia, Blur (5-tap soft blur), Shadows, Highlights, Lift, Gain, and Tint M/G (magenta/green balance). Plus Hue Spin to animate through a spinning hue cycle.
Audio Reactivity — per layer, choose which audio band drives reactive controls:
Bass, Mid, Treble, or Volume. Shape the response with Linear, Squared, Cubed, or Gate curves.
HD uploads — toggle before uploading to resize at 2048 px (default is 1024 px).
Meld — melt an image INTO the preset ✨ New
Every image, GIF, and video layer has a Meld button in its header. Flip it and
that layer is fed straight into the preset's own warp engine — instead of compositing on top, the
picture gets melted, tunneled, kaleidoscoped, smeared, and pulsed to the audio by
the preset itself. A logo dissolves into plasma; a face melts through a tunnel on the beat; a photo
becomes liquid. The card swaps to the Meld controls:
Flow — the melt motion: Tunnel, Spiral, Ripple, Swirl, Plasma, Liquid, Kaleido, Bloom, Smoke, Melt. Click to explore.
Size & Position — scale the image and place it (drag the pad); below full size it dissolves into the melt at its edges instead of tiling.
Mirror — H / V / Quad / Kaleido fold of the melted image, with a Kaleido spin speed.
Speed & Depth — Speed is true slow-motion (drag it down for a hypnotic, gooey slow melt that stays just as rich); Depth sets how hard it warps.
Spin / Zoom Pulse / Flow Pulse ✨ — beat-reactive melt motion, hardwired to the kick.
Luma Key — key the dark parts of the image out so the melt/feedback shows through cleanly.
Mask ✨New — use the image's bright shape as a crisp stencil: the image shows inside its silhouette while the preset's own melt keeps swirling outside. Turn it up for a sharper edge — perfect for filling a logo or text with the visual.
Displace ✨New — the image's brightness physically warps the melt: bright areas push out, dark pull in, so the picture's shape ripples and embosses the plasma.
Blend mode — how the image fuses with the melt: Mix, Add (glow), Screen, Multiply (stamp), Difference (psychedelic), Overlay (contrast).
Colour — grade the image before it melts in: Brightness, Contrast, Saturation, Hue, and Invert.
Presence + Audio — how present the image stays in the loop, pulsing in on the beat (Bass / Mid / Treble / Volume).
Only one layer melds at a time, its overlay hides while it drives, and 🎲 Remix
rolls the whole melt look for you — lock Flow in the Remix locks to keep a melt
you love and re-roll everything around it. Works with still images, GIFs, and live video.
Layer Animation ✨ New
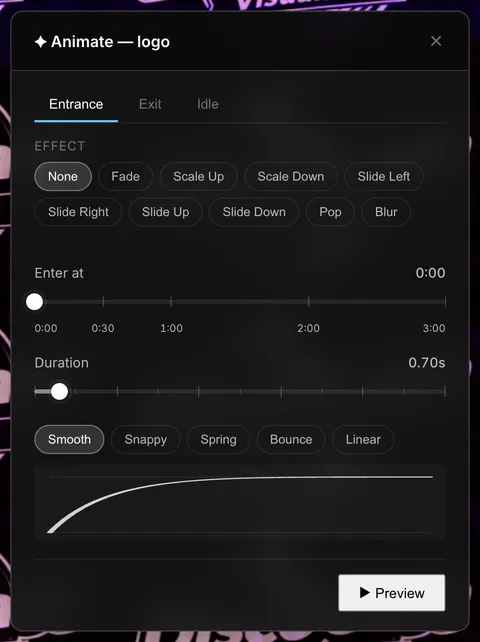
The ✦ Animate window: Entrance / Exit / Idle tabs, timing, duration and easing.
Every layer card now has a ✦ Animate button in its header that opens a focused modal — a creative planning tool for how each layer arrives, leaves, and breathes on screen. The modal is a draggable floating panel so the canvas stays visible and live while you tune. Three tabs:
Entrance — how the layer arrives. Pick a chip: Fade, Scale Up, Scale Down, Slide Left / Right / Up / Down, Pop (overshoot), or Blur (focus-in). Each preset reveals one contextual parameter underneath — Slide has Distance, Scale has Start size, Pop has Pop from, Blur has Start blur. Auto-fires whenever a preset loads so it plays for real, not just in preview.
Exit — how the layer leaves. Mirror chip set (Fade, Scale, Slide, Pop, Blur) with their own end-state params. Plays when you delete the layer — the layer holds on screen for the full tween before it actually goes.
Idle — continuous motion while the layer is visible. Float (vertical bob), Pulse (scale breathing), Sway (gentle rotation), Spin, Drift (two-axis wander), or Breathe (opacity in/out). A single Speed multiplier scales the loop period.
Enter at / Exit at — schedule exactly when each layer enters and exits within the preset's lifetime (0:00–3:00). Drag the Enter at scrubber on the Entrance tab to hold the layer invisible until that moment, then fire the entrance tween. Drag Exit at on the Exit tab to trigger the exit tween at a chosen time. Default 0:00 / no exit = the original always-on behaviour. These are timing controls — separate from the entrance / exit Duration.
Plays live — not just in the editor. Entrance, idle, and timed Enter at / Exit at schedules all run in the player and in the timeline, not just while editing. Cross-fading between presets also respects the animation state.
Modern controls everywhere. Duration is a visual scrubber (drag the handle along a tick-marked track, with a live readout that updates as you drag, plus keyboard arrows for fine control). Ease is a chip row with a live SVG curve preview — pick Smooth / Snappy / Spring / Bounce / Linear for entrance, or Smooth / Snappy / Linger / Wobble / Linear for exit, and the curve redraws to show exactly what the motion will do, overshoot and all. A ▶ Preview button replays the entrance or exit tween on the live canvas so you can tune without committing.
Composes with audio reactivity. Animation is "when" — entrance / exit / idle. Reactivity is "how it behaves moment-to-moment." Both run independently on the same layer: a layer can fade in (animation) while already pulsing to the kick (reactivity). The accent dot on the ✦ button lights up whenever any animation is active so you can see at a glance which layers are animated.
Animated GIFs
Drop a .gif file into any image-layer slot and it animates inside the visualizer — not
as an overlay, but as a real texture, so every layer effect (tile, mirror, spin, orbit, beat-pulse, hue
spin, blend mode, etc.) applies to the GIF on every frame.
Speed slider — top of every GIF layer card. Range 0.25× to 4×; default 1.2× (most
GIFs feel a touch slow at native speed). Drag live, no reload.
Native frame timing — each GIF's per-frame delays are honoured at 1×, then divided
by the speed multiplier. Long-delay GIFs (10 fps memes) and short-delay ones (smooth animation) both
behave naturally.
Stack with effects — try a GIF with Tile + Mirror Kaleido + Hue Spin for
psychedelic results, or pair Beat Fade with a low speed for a strobe-feel.
Saved with the preset — speed is persisted, so loading a saved preset restores the
exact playback rate you set.
File size — GIFs are stored uncompressed once decoded; very large or long GIFs can
use significant memory. Trim or downsize beforehand if you hit limits.
Video Layers New
Drop MP4 or WebM video files directly into presets — videos render as
real-time GPU textures with full playback controls and effects. Auto-transcoding: 1080p and 4K videos are automatically optimized to 720p on upload.
File support — MP4 (H.264) and WebM (VP9). 720p output for smooth performance.
Drop any resolution — 1080p and 4K videos auto-transcode to 720p with progress feedback.
Playback controls — Play/pause button, loop toggle, speed slider (0.25×–4×),
and scrub bar for seeking within the video.
Tiling — Videos tile like image layers. Turn on Tile for Density or Grid mode with the full per-cell toolkit — Offset, Cell Rotate, Popcorn, Size/Jitter/Opacity Var + Seed, Spacing, Group spin, per-tile Mirror, and Tunnel. With Tile on, the Scale slider becomes the tile Size (density); with Tile off, Scale (0.1–2.0) sets single-instance coverage. Tiling works for transparent videos too.
Width & Height — Independent non-uniform scaling sliders (0.25×–4× each). Stretch or squash the video on one axis without affecting the other. The video’s position never drifts when adjusting these.
Border — Colored ring drawn just outside the video edge. Set Width, Color (color picker), and Feather (soft glow vs hard line). Found in its own Border section below Tint.
All effects work — Spin, Orbit, Bounce, Chromatic Aberration, Luma Key, Wave Distort,
Invert, Threshold, Pixelate, Scan Lines, Film Grain, audio reactivity,
and the full color grading suite (Brightness, Contrast, Gamma, Fade, Color Temperature, Sepia, Blur, Shadows, Highlights, Lift, Gain, Tint M/G) apply to every video frame.
Transparency support — Drop a WebM with an alpha channel and the video composites over the visualizer with full transparency. See Transparent Video Layers below for the full workflow.
Limits — 2 video layers recommended for best performance. Videos stream from disk so length is flexible; 1–2 minute clips work smoothly, longer videos may show memory pressure on low-end devices.
Transparent Video Layers ✨ Pro
Drop a transparent WebM (a video with a built-in alpha channel) onto any preset and the subject floats over the MilkDrop visualizer with full transparency — no green screen, no black box, no compositing chops required. This unlocks rotoscoped cutouts, animated logos, talking-head loops, particle accents, and AI-isolated subjects as first-class VJ elements.
Sammie Roto workflow — Sammie Roto is an AI rotoscoping tool: point and click to cut out any subject (a dancer, a logo, an object, an animal) and export as transparent WebM. Drop that WebM into DiscoCast and it renders with perfect alpha over your visuals.
Works on every platform — Web, Windows, and macOS all support transparent WebM. On macOS the app automatically converts incoming transparent WebMs to a format Apple’s WebKit can decode (one-time, per-clip, with a live progress toast).
All effects still apply — including Tiling — Spin, Orbit, Wave Distort, Luma Key, Pulse, Mirror, Chromatic Aberration, audio-reactive opacity, and full Tile / Grid with the per-cell stack — every effect that works on a regular video layer works on the transparent one. The alpha channel survives the full pipeline, so each tile keeps its cutout.
Use Alpha Mode = Preserve for a clean cutout look (default for transparent imports), or set it to Fade to dissolve the cutout into the background by audio reactivity.
No other VJ tool does this end-to-end — point-and-click AI cutout → transparent video → live audio-reactive VJ effects, all in one workflow.
Transparent Background ✨
Make the whole preset transparent — not just one layer. Instead of your layers sitting on a black canvas, the background becomes truly see-through, so your image, transparent-video, GIF, and text layers float on nothing. This is the foundation for stacking presets in the Timeline: a transparent-background preset placed on a zone reveals whatever zone is beneath it.
Two switches, in the Layers tab — turn on Show layers only (hides the MilkDrop visualizer so only your layers render), then turn on Transparent background (clears the canvas to transparent instead of black). A checkerboard appears behind the canvas in the Studio so you can see the transparency — it's an editor-only indicator and never shows in a show.
Works with any layer — images, transparent videos, GIFs, and text all float on the transparent canvas. (Verified across web, macOS, and Windows with both image and transparent-video layers.)
The Timeline payoff — save a transparent-background preset, drop it on a Timeline zone stacked over another zone, and the lower zone shows through the empty areas. Stack a rotoscoped subject or a logo over a full-screen MilkDrop preset and they composite as real layers.
MilkDrop presets are untouched — this only applies when Show layers only + Transparent background are both on. Every normal preset renders exactly as before.
Text Layers New
Add a live text layer using the ✏️ Text button in the Layers tab. Text renders as a real GPU texture — every layer effect applies to it.
Typography — 20 bundled fonts across 5 groups (Standard, Display, Tech/Sci-Fi, Retro/Pixel, Handwritten), weight, size (24–200px), letter spacing, line height, alignment, and color.
Effects — drop shadow (blur, X/Y offset, color), outline (width, color), and background box (color, padding, opacity).
Blend mode — controls how text composites over the visualizer. Normal (default) draws text exactly as typed — precise, predictable color. Overlay brightens light areas and deepens dark ones — text feels embedded in the visual. Screen only adds light (soft glow). Multiply only darkens (stamp/burn effect). Add creates bright flares. Difference inverts colors dynamically for psychedelic results.
All transforms work — Tile, Spin, Mirror, Orbit, Bounce, audio reactivity — same as image layers.
Two size controls — Typography Size changes how big the glyphs are; Blend Size controls how many tiles fill the screen. Use both together.
Saved with the preset — text content and all settings are persisted and restore on load.
Chromatic Aberration
RGB channel split with animated offset — creates a glitchy color-fringe effect. Found in the Visual
Effects section (between Tint and Audio Reactivity) on each image layer.
Chromatic slider (0–1) — amount of red/blue offset. Uses a squared curve for
responsive control at low values; you’ll see the effect within the first quarter of the slider.
Speed slider (0–4) — animation rate of the offset. Appears automatically when
Chromatic is greater than 0. Red and blue channels animate in opposite directions while green stays
anchored.
Works in all modes — tiled, non-tiled, and tunnel. The effect respects image bounds
in non-tiled mode (no bleeding outside the image).
Saved with the preset — both amount and speed persist in the preset JSON.
Pan — Left/Right & Up/Down Translation
Each image layer has a Pan section (below Wander) for deliberate whole-group
translation. When a layer is tiled, Pan always moves the entire grid as one — the pattern scrolls
seamlessly at the wrap edge, never individual tiles.
Drift — continuous linear travel. Set X and/or Y speed (−2 to +2 UV/sec, signed so
negative reverses direction). With Tile ON this creates an endless scroll — logo parade, star-field
drift, ticker. With Tile OFF the image slides off-canvas.
Bounce — ping-pong between extremes. X and Y speeds set the oscillation rate
independently; Range sets the half-amplitude. Effectively a 2D Sway with full axis control.
Composes freely — Pan stacks additively on top of Sway, Wander, and Orbit. Try
Drift X + Orbit for a spiraling scroll, or Bounce Y + Sway for a figure-eight wobble.
Saved with the preset — mode, speeds, and range all persist in the preset JSON.
Angle (Static Tilt)
An Angle slider (directly below Spin on each layer card) sets a fixed rotation offset
from −180° to +180° without any continuous spinning.
Pure tilt — set Spin to 0 and drag Angle to lock the image at any diagonal. Great
for logos at a jaunty angle or diagonal tile grids.
Spin offset — when Spin is also non-zero, Angle acts as the starting angle of the
rotation, so the spin begins from your chosen tilt rather than 0°.
Works in all modes — tiled (rotates per tile), non-tiled (rotates the whole
image), and tunnel.
Saved with the preset — persists in the preset JSON. Presets without an Angle
field default to 0° (no change).
Skew X / Y
Two sliders directly below Angle that apply a 2D shear transform — sliding opposite edges in
opposite directions to make tiles and images parallelogram-shaped.
Skew X (−1 to +1) — slides the top edge left or right relative to the bottom.
Positive values lean the image to the right; negative lean it to the left.
Skew Y (−1 to +1) — slides the right edge up or down relative to the left.
Combine both axes for diamond or rhombus-shaped tile grids.
Pairs with Angle and Width/Height — together these four controls give you a
complete 2D affine toolkit: rotate, scale, and shear any image independently.
Works in all modes — tiled, non-tiled, and tunnel. Applied after rotation,
before sizing, in every pipeline path.
Saved with the preset — both values persist. Older presets default to 0 (no
skew).
Perspective Tilt
Two sliders — Persp X and Persp Y — directly below Skew in each
layer card. Unlike Skew (which keeps parallel lines parallel), Perspective makes lines converge
to a vanishing point, simulating depth.
Persp X (−1 to +1) — left and right edges converge. Positive tilts the image
away from you on the right side; negative on the left. Great for billboard lean or forced-perspective
text.
Persp Y (−1 to +1) — top and bottom edges converge. Positive creates a classic
floor-tile vanishing point receding upward; negative fans it toward you.
Combine with Skew + Angle — together these give you a full 2D projective
toolkit. Persp Y + Tile is the go-to for infinite floor or ceiling grids.
Works in all modes — tiled, non-tiled, and tunnel. Applied after Skew in every
pipeline path. Singularity is clamped so extreme values stay safe.
Zero cost at 0 — no shader code emitted unless a non-zero value is set.
Depth Stack
A Depth slider below the Tunnel slider (visible when Tile is ON) that offsets
a layer's zoom phase in the tunnel, making it appear to fly through space at a different Z depth
than other layers.
The classic move — two layers, same image, Tunnel speed identical, Depth = 0
on Layer 1 and Depth = 0.5 on Layer 2. The tiles zoom past each other in true parallax —
no other setting achieves this.
Range 0–1 — 0.5 = exactly 180° phase offset (maximum parallax). Other values
give subtler staggered rhythms.
Tunnel-only — the slider is hidden when Tile is OFF. Zero cost at 0.
Combine freely — each layer can have its own Depth, Spin, Tint, and Size
for a full multi-plane 3D look.
Edge / Sobel
An Edge On/Off toggle in the Visual Effects section that replaces the image with
its edge-detected outline — turning any photo into animated neon line art.
How it works — a 3×3 Sobel kernel samples 8 neighbouring pixels, computes
the luminance gradient, and uses the magnitude as brightness. High-contrast edges glow white;
flat areas go black.
Best combo — Edge ON + Tint color + Hue Spin. The monochrome edges take
the Tint color perfectly, and Hue Spin cycles the outline through the full spectrum.
Layer it — one layer with Edge ON (neon outlines) blended over a second layer
with the original image creates a mixed illustration style.
Works in all modes — tiled, non-tiled, and tunnel. Posterize stacks on top
for an extra-crunchy look.
Zero cost when Off — no extra samples taken unless enabled.
Beat Shake
A Shake slider in the Audio Reactivity section (below Bounce) that jolts the image
in a random direction on every beat.
Omnidirectional — unlike Bounce (always up), Shake fires in a new random
direction each beat for a chaotic, glitchy energy.
Scales with audio — uses the same shaped audio signal as Pulse and Bounce, so
Reactivity Source and Curve both apply.
Combine freely — stack with Bounce for upward-biased chaos, or with Sway for
an organic tremor feel.
Cubic curve — the slider gives fine control at low values; big jolts live at
the top end.
Posterize
A segmented button row in the Visual Effects section (Off / 2 / 4 / 8 / 16) that
buckets each color channel into discrete steps — turning any photo into flat graphic art.
2 steps — hard 2-tone silhouette. Graphic and bold.
4 steps — classic pop-art look. Great with a bright Tint color.
8 / 16 steps — subtle banding, still photographic but stylized.
Pairs with Hue Spin — the limited palette cycles through hues for an animated
retro palette effect.
Off = zero cost — no shader code emitted when set to Off.
Tile Width & Height
Two sliders in each image layer card (visible only when Tile is ON, sitting below
Spacing) that let you independently control the shape of each tile cell.
Width (0.25–4.0) — stretches or squashes tile cells horizontally. 1.0 = native
image aspect ratio (the default). Push below 1.0 for narrow portrait-style cells, above 1.0 for
wide panoramic ones.
Height (0.25–4.0) — same control on the vertical axis. Combine with Width to
make square cells from a landscape image, or tall slivers from a square one.
Squared curve — both sliders use a squared response so the 1.0 default lands at
roughly mid-travel. Fine adjustments in the lower half, big stretches at the top.
Composes with Spacing — changing cell shape doesn't affect gap size. Spacing
still controls the gap between tiles as a fraction of each cell.
Saved with the preset — both values persist in the preset JSON. Presets saved
before this control existed default to 1.0 and render identically.
Luma Key
Two sliders under a Luma Key sub-header in the Visual Effects section that make pixels
transparent based on brightness — great for cutting out backgrounds.
Key Lo (0–1) — pixels darker than this luminance become transparent. Use to remove
dark/black backgrounds.
Key Hi (0–1) — pixels brighter than this luminance become transparent. Use to remove
white/light backgrounds.
Soft falloff — uses smooth blend near the threshold for clean edges, not hard cut.
Works on all layers — image, video, and text. Combine both sliders to isolate only
mid-tones.
Screen Overlay
Each layer has an Overlay section (below Film Grain, above Audio Reactivity) that draws a colored shape anywhere on the full screen — perfect for darkening areas, creating spotlight zones, or masking parts of the canvas.
Enable toggle — off by default. Turn on to reveal the overlay controls.
XY Pad — drag the dot to position the overlay center anywhere on screen.
Width / Height — size of the shape. At 1.0 both axes cover the full screen.
Corner — morphs between a sharp rectangle (0) and a fully rounded ellipse (1).
Strength — opacity of the overlay. 0 = invisible, 1 = fully solid.
Feather — edge softness. 0 = hard cut, 1 = very soft glow-like fade.
Color — any hex color. Black darkens the area (vignette), white lightens it, any color tints it.
Layer ordering: the overlay composites immediately after its own layer — so any layer higher in the stack sits on top of it. Use this to frame content: put a dark overlay on Layer 1, then place a logo or video on Layer 2 and it will render cleanly over the darkened area.
Wave Distort
Two sliders under a Wave Distort sub-header that apply sinusoidal UV warping — makes
images ripple and melt.
Wave (0–1) — amplitude of the displacement. How far pixels shift.
Freq (1–20) — number of sine cycles. Low = gentle sway, high = tight ripples.
Appears when Wave > 0.
Audio-reactive — amplitude is boosted by the audio signal (bass hits make waves bigger).
Works on all layers — image, video, and text.
Color FX — Invert & Threshold
Two sliders under a Color FX sub-header for dramatic color manipulation.
Invert (0–1) — blends between normal and color-negative. 0.5 = 50/50 mix for a washed look.
Threshold (0–1) — converts the image to binary black & white at the given luminance
cutoff. Audio-reactive: bass shifts the cutoff for pulsing silhouettes.
Three sliders under a Texture sub-header for retro and analog looks.
Pixelate (0–1) — reduces resolution into chunky mosaic blocks. Low values = subtle,
high = extreme 8-bit look. Affects UV before texture sampling.
Scan Lines (0–1) — CRT-style horizontal dark bands across the image. Great for retro
monitor or VHS aesthetics.
Film Grain (0–1) — animated noise overlay for cinematic/analog film texture. The noise
pattern changes every frame for a living feel.
Works on all layers — image, video, and text. Combine with Posterize or Threshold
for maximum retro impact.
🎬 Timeline Editor
A dedicated page for scripting a full live show. Arrange presets into timed blocks on a horizontal strip,
then hit Play — the visualizer runs your sequence automatically. Launch it from the start screen.
Overview Pro
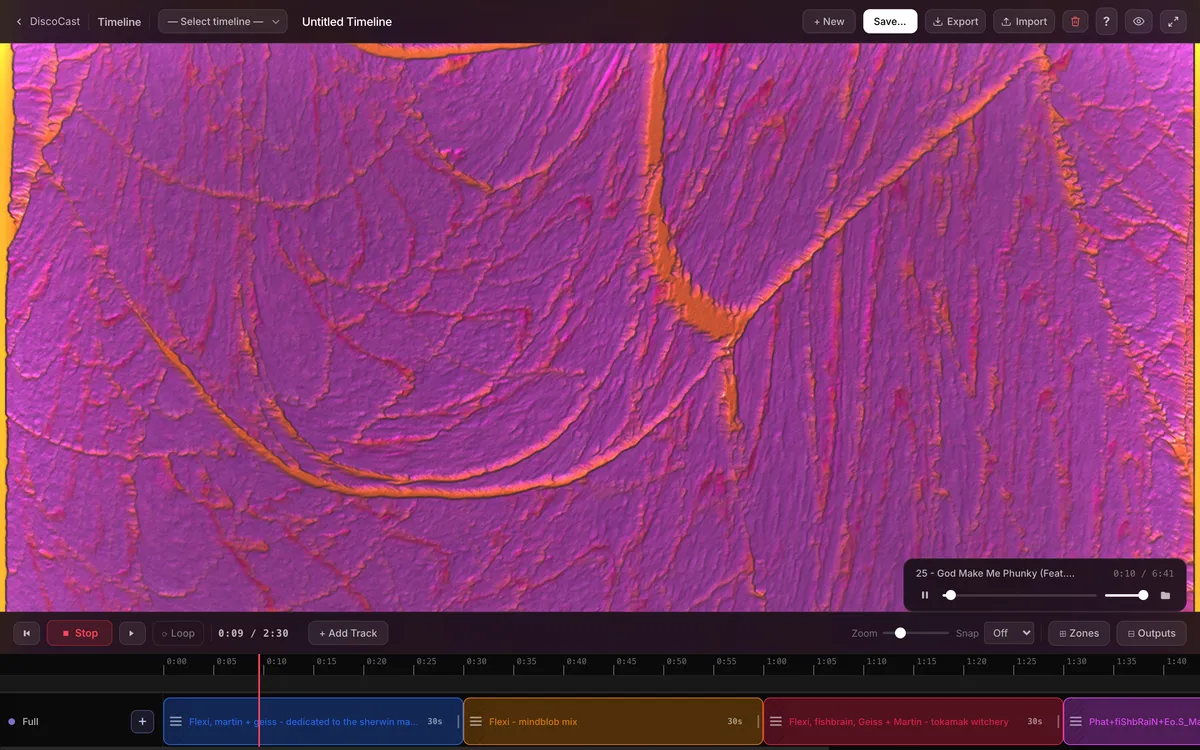
The Timeline: the show on top, transport + zoom in the middle, and preset blocks laid out over time below.
The Timeline Editor is a complete show sequencer for scripted performances. Create timed blocks, arrange them on a horizontal strip, add transitions, and play back your show with VJ Mode — where stopping only pauses the timeline, not the visuals.
Blocks — preset containers with duration and transitions
VJ Mode — stop pauses timeline, visuals keep playing
Multi-Zone — split canvas into multiple regions
Multi-Track — stack presets as layers
Markers — cue points and loop regions
🎛️ VJ Mode — The Show Never Stops
Stop pauses the timeline, but visuals keep playing. The last preset stays visible —
no black screens, no awkward silences. Press Play to resume timeline progression. Drag the ruler to
scrub through time while keeping visuals alive. Perfect for live VJ sets where the show must go on.
Timelines & Blocks
A timeline is a playlist of preset blocks, each with a fixed start time, duration, and transition
style. Blocks sit on a scrollable strip — drag them to any position, drag the right edge to resize to
any length (the strip auto-scrolls as you drag, so you never run out of room), or drop them into any
gap. Multiple timelines can be saved and switched between.
Transport
Space — play / pause
Home — jump to start
← / → — previous / next block
↑ / ↓ — nudge playhead ±1s (hold Shift for ±5s)
Drag the ruler to scrub to any point while playing
Editing while playing
You can drag, resize, edit, duplicate, or delete blocks while the timeline is running. The playhead position is preserved and playback continues from where it is.
Block gestures
Single-click a block body — selects it; hold and drag to move
Double-click a block body — crossfades into that preset and seeks the playhead to its start time
Drag the right edge of a block — resize it to any length; the strip auto-scrolls as you drag, so you can stretch a block far past the visible window in one motion
Click the ☰ icon (left of block) — opens that block's menu: a Transition picker, a colour picker, Duplicate, and Delete; click again to close
Block transitions
Each block's ☰ menu has a Transition picker that sets how the block enters:
Fade (crossfade from the previous preset), Black or
White (dip through that colour), or Cut (instant switch). It's a
per-block creative choice — pick Black for a deliberate beat of darkness between two presets.
Multi-Zone Output
Split the canvas into up to four simultaneous regions, each running its own preset independently.
Define rectangular zones and assign timelines to each. The canvas splits to show all active
zones — perfect for multi-projector venues. Launch from Output Settings → Zones.
Multi-Track Stacking ✨ New
Stack multiple presets inside a single zone — a layer compositor on the Timeline. In
Full Screen the transport row has a + Add Track button. In
Left/Right, Quadrants, and the other multi-zone layouts, each zone has
its own inline + Track button on its front-layer row. Up to 4 tracks per zone (each
track is a real engine).
Top row = front layer — the strip reads like the composite, Photoshop-style. New
tracks land on top, and the + Track button moves up with them so you can keep stacking.
Transparent gaps reveal beneath — added tracks default to transparent compositing,
so empty space on an upper track shows the track below (no black fill). Pair with the
Transparent Background Studio preset and the upper preset's own transparent pixels
reveal beneath too — real per-pixel layer compositing.
One output route per zone — the ▸ chip on each zone's foundational
row picks the display for that whole zone (every track in the zone rides the same output). Stacked
zones expose per-track blend mode + opacity in the Outputs panel for fine-grained compositing.
Remove a track with the × on its row. A zone's foundational track
(the original layout zone) stays — that's where the zone's rectangle and output assignment live.
Markers & Loop Regions
Markers live in their own lane just below the ruler. Press M to drop one at the
playhead, or click anywhere in the marker lane to drop one there. Click a flag to edit its
label, colour, and action. Jump to markers instantly with 1–9.
(The ruler itself is playhead-only — click it to seek.)
Set a marker's action to Auto-Stop and the playhead parks there when it
arrives — visuals keep running, great for talk breaks. Set it to Loop and the
marker becomes a loop region: a band appears with a draggable end handle.
Drag the handle to size the loop, the flag to move its start, the band to slide the whole
region — playback loops that span, easing across the wrap with a 1-second crossfade.
Saving & Managing Timelines
New timelines are held in memory until you click Save. Once saved, the button dims to
Saved and shows a dot whenever you have unsaved changes. Use + New to start
fresh, or the dropdown to switch between saved timelines. Copy / Paste JSON buttons let you back up
or share a timeline as text.
Controls & Auto-hide
All overlays (topbar, transport, timeline strip) fade after 3.5 s of inactivity — the same pattern as
the main app. The ≡ button in the top-right corner pins them permanently; click again
to unpin. Press T to toggle the strip panel on and off without touching the mouse.
Pro Tips
Overlap presets for smooth crossfades — no black gaps
Double-click any block during playback to cue it instantly — great for live improvisation
Edit block durations and positions while playing — the timeline adjusts in real time
Press M on the beat to drop markers live, then set one to Loop and drag its handles to loop a section
Scrub the ruler to audition any moment before going live
Multi-zone setups let you run different visuals on different screens
Reactivity & Audio Controls
Every image layer has a Reactivity panel at the bottom of its card. The two settings
there — Source and Curve — are the dial behind the dial. They shape the single audio
signal that drives every reactive control on that layer: Pulse, Bounce, Shake, Beat
Fade, Strobe, and the beat-driven effects Tilt, Hop, Hue
Pulse, Blur Pulse, and Squash.
Step 1 — Pick a Source
Which frequency band feeds this layer's reactivity:
Bass (default) — sub and kick frequencies. The most punch-per-beat; most presets
start here.
Mid — snare, vocals, guitars. Reacts on melodic and rhythmic hits mid-song.
Treble — hi-hats, cymbals, air. Fast and bright; great for sparkle layers.
Volume — total loudness across all bands. Tracks the overall energy of the mix.
Flux — spectral flux onset detection. Fires on transients: snare hits, claps,
plucks, percussive attacks. Stays near-zero during sustained notes or held chords. Use it when Bass
smears across the beat and you want only the sharp edge of each hit.
Step 2 — Shape the Curve
The curve transforms the raw signal before it reaches any control. A gentle signal becomes more
dramatic — or more surgical:
Linear — signal passed as-is. Controls scale directly and evenly with audio level.
Squared — quiet moments are suppressed; loud peaks hit harder. The most musical
curve for most layers.
Cubed — extreme contrast. Only the very loudest peaks drive any visible reaction.
Gate — binary on/off at 30%. Below the threshold: zero. Above it: full signal.
Controls either stay still or snap to maximum.
What Each Control Does With the Signal
Pulse — grows the layer size on every peak. The curve determines whether small
beats cause any growth at all — Squared suppresses gentle hits, Cubed reserves the swell for the
loudest moments only.
Bounce — lifts the layer upward on beat. With a Gate curve it snaps up hard on
kicks and drops instantly between them. With Linear it floats up and down with the groove.
Beat Fade — adds opacity on beat. The layer appears or brightens with the audio,
then fades back when the signal drops. Combines beautifully with low base Opacity so the layer is
normally invisible and only materialises on hits.
Strobe — unlike the others, Strobe reads the raw audio signal directly
(before the Curve is applied) and compares it to its own Threshold slider. When the audio crosses the
threshold, the layer's opacity hard-cuts to black — instantly. When the beat fades, it returns. This
is a true strobe: no smooth ramp, just a sharp on/off flash driven by real beats.
Tilt ✨ — snap-rotates the layer on every beat, up to ±15°. A
←/→ chip sets which way it kicks; it eases back toward upright between hits. Gate
curve makes it a sharp jerk; Linear makes it rock with the groove.
Hop ✨ — the sideways cousin of Bounce. Kicks the layer left or right on beat —
pick the direction with the ←/→ chip. Pair Hop with Bounce for a diagonal beat
shove.
Hue Pulse ✨ — shifts the layer's hue on every beat (a full colour-wheel sweep at
maximum). Rides on top of any Hue Spin you've set, so the colour jumps with the music.
Blur Pulse ✨ — pulls focus on the beat: the layer blurs on each hit and snaps
sharp between them. A cinematic emphasis that breathes with the track.
Squash ✨ — cartoon scale on beat. Wide stretches the layer
horizontally and crushes it vertically on the hit; Tall does the inverse. Reads as
classic squash-and-stretch animation locked to the music.
Example Combos
Kick-lock flash — Source: Bass · Curve: Gate · Strobe: 1.0 · Threshold: 0.4 · Base
Opacity: 0. The layer is invisible except on every hard kick, where it flashes at full opacity. Zero
ambient light between beats.
Melodic drift — Source: Mid · Curve: Squared · Bounce: medium. The layer lifts on
snare or vocal hits, barely moves between them. Feels tied to the melody rather than the kick.
Ambient breathing — Source: Volume · Curve: Linear · Beat Fade: 0.6 · Base Opacity:
0.2. The layer's opacity tracks the mix energy — bright during builds, dim during breakdowns. Feels
alive without being distracting.
Treble sparkle — Source: Treble · Curve: Cubed · Pulse: high. The layer explodes in
size on hi-hat and cymbal peaks only. Everything below that frequency is invisible to it.
Multi-layer stack — put two layers side by side: one on Bass/Squared driving
Bounce, one on Treble/Cubed driving Pulse. They react to completely different parts of the music and
never compete.
Cartoon bop ✨ — Source: Bass · Curve: Gate · Squash: medium (Wide) + a touch of
Tilt. The layer flattens and rocks on every kick like a bouncing logo — squash-and-stretch synced to
the beat.
Colour strobe ✨ — Source: Treble · Curve: Cubed · Hue Pulse: high. The layer's
colour jumps on hi-hats and cymbals only, leaving its hue still through the rest of the bar.
Tip: a layer with Strobe on and Beat Fade off feels like a strobe
light. Flip it — Beat Fade on and Strobe off — and it feels like a soft glow that pulses
with the music. Both use the same Reactivity panel; only the control you turn up changes the personality.
Keyboard Shortcuts
Shortcuts work on the main visualizer canvas. Some keys have different functions in the Timeline Editor — see the separate section below.
🎛️ Main Visualizer
Default view
Performance
VStrobe flash
BBlackout
IInvert colors
HHide UI instantly
ShiftHold for Energy boost
Audio
AToggle Auto-Gain
KToggle Kick-Lock
TOpen tuning panel
SpacePlay / pause (file mode)
Navigation
← / →Previous / next preset
RToggle auto-cycle
COpen cycle settings
POpen presets drawer
OOutput settings
EOpen Preset Studio
SToggle favorite
XHide current preset
View
FFullscreen
? / /Keyboard guide
EscClose drawers & menus
🎬 Timeline Editor
Separate page
These shortcuts only work when you're in the Timeline Editor page. To open the Timeline Editor, click its button on the start screen or in the control bar.
Transport
SpacePlay / Pause (VJ mode)
HomeGo to start (keep visuals)
← / →Prev / Next block
↑ / ↓Nudge ±1s (±5s with Shift)
Navigation
MDrop marker at playhead
1 - 9Jump to marker
?Keyboard shortcuts
FFullscreen
Tips & Troubleshooting
Microphone access
If the mic button fails, make sure DiscoCast Visualizer has microphone permission in your system
sound/privacy settings, then try again.
Your data stays local
Favorites, hidden presets, and saved custom presets are all stored locally on your computer. Nothing is
uploaded.
Performance
For the smoothest visuals on older machines, use F for fullscreen, close other apps running
video or 3D graphics, and prefer file input over live (less processing overhead).
Projector / VJ setup
Press H to hide the UI completely for a clean feed, then F for fullscreen. For a
locked projector resolution, press O to open Output Settings — set your projector’s
native resolution (e.g. 1920×1080), pick Letterbox, and the canvas renders at that size regardless
of your laptop screen. Move the mouse to bring controls back.
 DiscoCast